 Format Clocks Format Clocks
From the Files menu, choose Format Clocks or click the large Format Clocks button.
This section is used to make minute by minute music clocks indicating the time that titles or program events should be played. You also may insert "program notes" (reminders to DJs) at the times you want them to occur. Most format clocks can be used for many different hours on your station. Create a different clock for each specific "hour-type" you may have. (Some stations have only one or two clocks, some have many more).
You'll see a browse window listing all format clocks that have already been built. Notice that those clocks which are scheduled on an "on-air" day-list are marked "On Air" in the right-hand column. Marked are those clocks which are included in day-lists that are currently scheduled for at least one day a week as on-air day lists. This column can not be changed from within the clock editing screen.
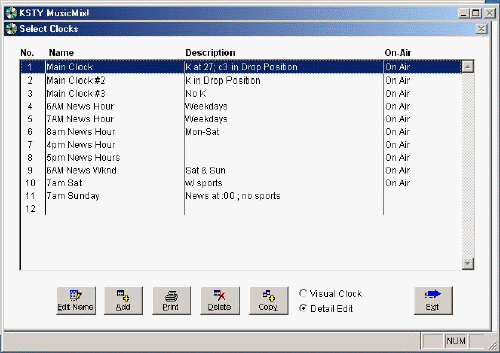
To select a clock for editing, double click on the clock number, or highlight your selection and press {Enter}. You'll be taken to the Build-Clock screen.
Edit Name:
Click Edit Name to change the name or description of the highlighted
clock.
Add:
Click Add to create a new format clock from scratch.
Print:
Prints a listing of all clock names, numbers and their "on-air" status.
Delete:
Move the light-bar to a clock and click Delete to remove an existing clock. Be
careful not to delete a clock that is used in a day-list for scheduling.
Copy:
You can easily create a new clock that is nearly the same as an existing clock.
Move the light-bar to the clock you want to use as a basis for the new one, and
click Copy. This copies the highlighted clock to a new slot.
Clock Options:
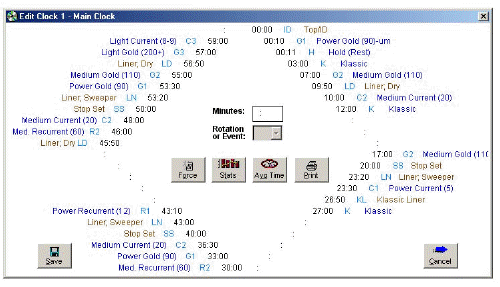
Select "Visual Clock" to edit in a shaped display which easily shows how things
fall in each quarter hour. Select "Detail Clock" for a columnar listing of each
minute. (The Detail Clock allows an unlimited number of entries.)
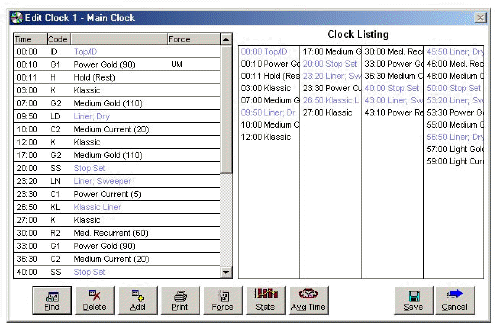
Here you'll see each minute of the hour when a "playlist element" is scheduled. An element could be a:
Detail Style Clock:
Visual Style Clock:
Time, Code:
For each event, enter the minute and seconds that the event should occur. After
entering the time, enter the code to play at that time. Enter a rotation code
to schedule a song in the slot, or an event code to schedule a program event.
(Press {Alt}+{DownArrow} to activate a drop-down list of all valid rotation and
event codes on the visual clock; Enter blanks to see a list of all codes on the
detail clock).
Example:
Coming out of news at :05 past the hour, you want:
- A reminder to appear on the printed playlist (indicated with a hyphen) to do a quick weather-forecast.
- Followed by a jingle (program event code "JI")
- Followed by a Power Current (rotation code "C1").
You add the following lines:
- 05:00 — Weather
- 05:20 JI (computer inserts): Jingle
- 05:30 C1 (computer inserts): Power
Program Notes:
To enter a program note instead of a music rotation or program event at any
minute, press the hyphen {-} instead of a rotation or event code. You'll be
given a box in which to enter a memo-line up to 25 characters long. Program
notes are used for printed playlists only. They are not exported in the daily
log file for automation. To program non-music elements such as voice tracks or
jingles for automation, you must use program events. The program note "Stop-Set"
has special meaning to the system. When printing the daily playlist, whenever
the system finds a Stop Set program note, it adds a line of asterisks to
visually break the page into your music segments.
Double Plays:
You may also schedule a special Repeat Title by entering {=} at the
rotation/event code box.
This is used to program a "double play" or a "block" of one artist. Pay close
attention to the Rotation Code before the "Repeat" slot. Be sure it's a category
(or has a forced attribute) that will feature only artists that you actually
want repeated, and that you have enough library depth to achieve the repeat. After you
select the "repeat" feature, you'll be shown a selection box listing all
available rotations. Click the check-boxes to select all rotations that
are acceptable for the system to use in finding a second title by the artist
just played. Click OK after you've selected all rotations. You may also force
a Music Attribute for the repeat-artist selection.
Both the "Visual Clock" and the "Detail Edit" screens contain the following push buttons:
Force Attribute:
Click Force to allow only
particular music attribute traits in the current timeslot. A window will appear listing all
available attributes. Move to the one you want to "force" and then input the
traits of that attribute. The system will then search for only titles with all
of those traits when it schedules that slot.
Example:
You require a medium or up-tempo Power Current song coming out of the news at :05. You enter the rotation code you've assigned to Power Current, then select "Tempo" as the attribute to force. You input "MU" to allow only a Medium or Up Tempo song in that slot.
During scheduling, the system will look only at those titles that match the
traits you specify for the forced attribute. Only if EVERY title it looks at
fails on EVERY scheduling rule you've specified, will it then ignore the forced
attribute. When the system is scheduling a title with a forced attribute, you
may allow it to "dig deeper" than normal through the available titles in
the rotation. (See System Options).
Stats:
View a listing of each music rotation and event category, and the number of
occurrences of each on this clock. Press {Esc} to exit.
Avg. Time:
Provides average song length in each rotation category to help plan music
timings as you create clocks.
Print:
Print a list of each item on the current clock.
Save:
Saves the format clock to disk (erasing the old version if there was one) and exits.
Cancel:
Exits without saving your work. Leaves the old version --if one existed-- as it
was.
Find:
Move to a certain minute on the format clock.
Delete:
Remove the currently highlighted item from the clock.
Add:
Add a new timeslot and playlist element to the clock.
Code (Sort Order):
Click the heading of the rotation code column to sort the listing by event
and rotation code. Events are listed first, then music codes. This
is useful for getting a look at how categories are spread across the hour.
By clustering all of the same codes together, you can quickly see how their
times compare.
Time (Sort Order):
Click the heading of the minutes column to sort the clock in normal (time)
order.
------------------------
See Also: Browse Clocks, Day Lists